
VirtualBox Networking: an overview
One of the greatest pitfalls when working with VirtualBox VMs is a good understanding of how networking works. In this post, we’ll discuss the most important differences between them, and their limitations when you use VirtualBox to experiment with setting up network services on a VM.
In our system administration courses, we use VirtualBox to allow students to set up their own Linux machines without having to resort to dual booting. VirtualBox is certainly not the “best” virtualization platform, but it is supported on the three common desktop platforms and works similarly on all of them.
Overview
A VirtualBox VM can be assigned 4 network adapters from the GUI (Machine > Settings > Network), and even more from the command line. In a VirtualBox VM with EL7, the network interfaces are usually named as follows:
- Adapter 1:
enp0s3 - Adapter 2:
enp0s8 - Adapter 3:
enp0s9 - Adapter 4:
enp0s10
You can choose the type of adapter between:
- Network Adress Translation (NAT): The VM is in an isolated network and has an Internet link through a virtual gateway. There is no route from the host system to the VM, though. This is the best way to ensure your VM has Internet access.
- NAT Network: Like the previous type, but network traffic between VMs in the same NAT network is possible
- Bridged (Br): The VM gets direct access to the physical network adapter of the host system. If a DHCP server is active on the network, the VM will get an IP within the same range as the host system. For other hosts on this network, the VM appears as just another host.
- Host only (HO): The host system and the VM are attached to a configurable virtual network (File > Preferences > Network > Host-only Networks). You can even set up a virtual DHCP server that issues your VMs with an IP address. Consequently, network traffic between hosts and VMs is possible. However, there is no gateway to the Internet in a host-only network.
- Internal (Int): VMs are attached to a virtual network, but the host system is not. There is also no gateway to the Internet, nor is DHCP provided.
The table below gives an overview of the consequences of each adapter on network routing between the VM and the rest of the world.
| Route | NAT | HO | Br | Int |
|---|---|---|---|---|
| VM ↔ Host | - | V | V | - |
| VM ↔ VM | - | V | V | V |
| VM ↔ LAN | - | - | V | - |
| VM → Internet | V | - | V | - |
At first sight, the Bridged adapter appears to be the most suitable for setting up a network service in a VM, but this is not the case. Read on to find out why!
In the sections below, each adapter type is discussed in more detail, including the network settings that you can expect.
The NAT interface
The VirtualBox NAT adapter is the default way of allowing your VM to access the Internet. However, it is normally not possible to access your VM from the host system over the network.
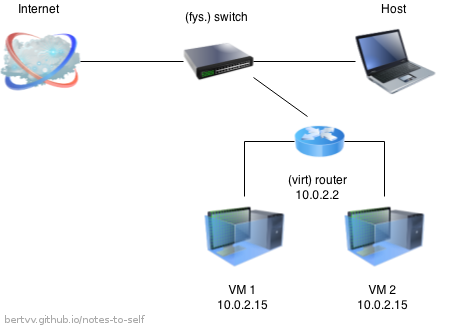
The network settings of your VM are predictable. Any VM with a NAT interface has:
- IP Address: 10.0.2.15 / 24
- Default gateway: 10.0.2.2 / 24
- Name server: 10.0.2.3 / 24 (potentially supplemented with the name servers assigned to your host system)
You can ping the gateway and name server from the VM, but pinging 10.0.2.15 from your host system will never work.
The NAT adapter is the most reliable to give your VM Internet access. If your host system can get on the net, your VM can as well. There is one exception: when you switch your host system between a wired and a wireless adapter while the VM is running, the latter will lose its access.
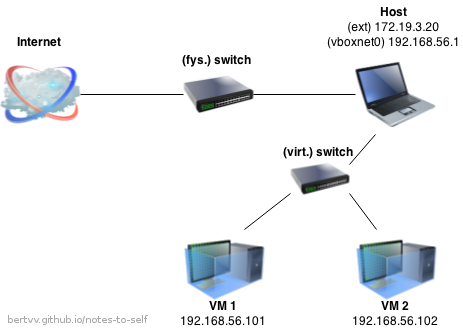
The Host-only interface
The VirtualBox host-only adapter allows network traffic between your host system and a VM. A virtual Ethernet interface is created that is also visible on your host system. You can create multiple host-only adapters and configure network settings from the main window by opening File > Preferences > Network > Host-only Networks.
A host-only interface is named:
- On Linux:
vboxnet0,vboxnet1, … - On Windows: “VirtualBox Host-only Ethernet Interface”. “VirtualBox Host-only Ethernet Interface #2”, …
The first host-only network that you create, will have the following default settings:
- Adapter
- IPv4 Address: 192.168.56.1 (= the IP-address assigned to your host system)
- IPv4 Network Mask: 255.255.255.0
- DHCP-server: enabled
- server address: 192.168.56.100 (= the IP address of a virtual DHCP server)
- Server Mask: 255.255.255.0
- Lower bound: 192.168.56.101
- Upper bound: 192.168.56.254
If a VM is configured to get an IP address automatically (i.e. via DHCP), it will probably get 192.168.56.101 (if it’s the first VM on this host-only network). You can use the range 2-99 to assign static IP addresses to your VMs.
It should be possible to ping between the host system and VMs on the same host-only network. If not, check whether your IP settings are correct: are they all attached to the same host only network? Do they have the expected IP address? Is the DHCP server for the host-only network active?
I strongly suggest to leave the default host-only interface as is, and create new interfaces when you want to work with other IP ranges. It may be needed to shut down all VMs and restart VirtualBox for configuration changes to come into effect, especially after creating a new interface.
The Bridged interface
As mentioned before, the bridged interface gives the VM access to the physical network on which the host system is attached. Other hosts on the LAN can likewise communicate with the VM.
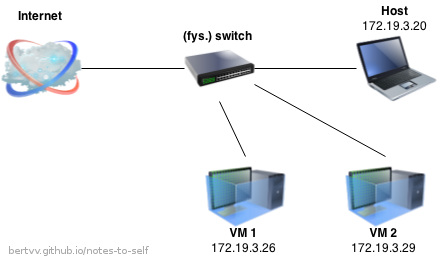
At first sight, this is the ideal setting for setting up a network service on a VM. However, there are big limitations:
- If you’re on a laptop and move between networks (home, work, …), the network address changes. Consequently, your VM will get another IP address (when it uses DHCP), or you need to reconfigure it manually.
- On some networks, the DHCP server will only assign an IP address to hosts with a registered MAC address. So it’s possible that your VM doesn’t get an IP. Setting one manually is dangerous, as it may collide with the IP of another host on the LAN (unless the network is under your own control).
- Bridging over a wireless interface is limited, and often doesn’t work at all
Recommendation: NAT + Host-only
If you’re setting up a network service on a VM that you at least want to access from your host system, this leaves you in a bit of a pickle:
- The NAT adapter doesn’t allow you to access the VM from the host
- The host-only adapter does, but your VM doesn’t have Internet access (so installing packages is kind of hard)
- The bridged interface is too unreliable: the VM’s IP address depends on the physical LAN, if it gets one at all…
So, no single adapter type is ideal. My recommendation then is to always give your VM two adapters.
- Adapter 1 is attached to an NAT interface, so your VM has Internet access and can install packages from on-line repositories;
- Adapter 2 is attached to a host-only interface, so you can access the server from the host system.
Another advantage is that you can give your VM a static IP that remains when you export the VM in order to pass it on to someone else.
The VM is not accessible from the physical LAN, but seen from a security standpoint, that’s more of an advantage…
Finally…
The NAT network and internal interfaces aren’t discussed in this article, they aren’t used as often as the other ones. Be sure to read the VirtualBox documentation if you want to delve deeper into the subject!
